
 Recently a student commented that she like the rules that I offered as part of training. Well, they’re more guidelines that I offer to students to help develop their technique. I use them so often that students can recite them back to me when asked. Something that needs to be kept in mind is that I don’t tell students anything that I don’t think is valuable. No drill or movement or tweak is given because it has no purpose. If the student doesn’t understand why they’re doing the drill, then they should train more.
This post came about because someone…Tanya…made a reference to NCIS and Gibbs’ Rules. Hopefully this makes sense to someone other than me and will be found beneficial to some of you, too.
Maybe the “Gibbs’s slap” will need to become part of my teaching technique. Yes, I have smart ass students!
(in no particular order)
1) Keep the sword between you and the bad guy.
This one is kinda simple and basic. The whole point of using a weapon is to have a “force multiplier”. If you don’t know that term, then you should check the work that Kasey Keckeisen and Randy King do. When the weapon is NOT directed toward the bad guy/opponent, then it is pointed in the wrong direction.
The concept is that once your sword gets behind you, the time and effort needed to get it back to an effective position takes too long.
What I tell students is that the sword should not go past your center line (the seam on each side of your uniform). This is to keep the sword from getting “behind” you. If the sword is too far behind you, it will be difficult to recover for the counter attack after a missed attack.
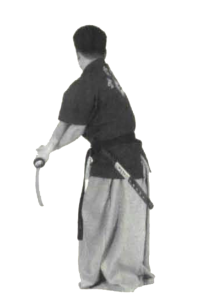
2) All cuts go forward. (see rule 6 picture)
True cuts don’t go down, up or across! They move forward into the target (until human anatomy makes the sword come back to the body). This is most often seen when students drop their hands through bent elbows and “flipping” the sword tip forward at the end of the cut.
3) All techniques start from your hips.
As with all martial arts, all sword cuts start in the hips. These cuts are either vertical, horizontal or spiral (start high and end low, or the opposite). Techniques tend to spiral up or down based on the torque created by “twitching” the hips. Just as every other martial art, your whole body does the technique. None are done with just arms or legs making things work..

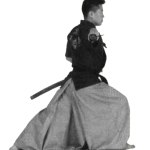
4) No kinky wrist.
Seseon Neri Begi (big angle downward cuts) should not end with kinky wrists (see image at left – figure 2 is bad). This tends to happen more in both Right cross cuts and downward cuts.
The main reason this occurs is trying to copy someone else’s technique. The whole end point for these cuts is dependent upon where YOUR shoulders stop! No one should try to make their sword travel as far as another. Do NOT try to copy others!
If you check out the image to the left, you’ll see what I tell students to work toward (in figure 1) and what not to do (figure 2).
5) Small steps for faster spinning (Thank you, Senior Chief Master Parnell)
Yes, this rule has been adopted from lectures and teaching from U.S.A. Haidong Gumdo Senior Chief Master Marshall Parnell. His words added to the concept that I had learned from my first Taekwondo teacher, Master Tom Sullivan. When learning the Dollio Chagi/Dwi Chagi (Round kick/Spin Side kick) combination from Chung Bong Sam Bon, he taught “step-in-the-bucket” at the completion of the Round kick to help lead into the turn and pivot for the spin side kick.
I have done this in Taekwondo for almost 37 years. When Chief Master Parnell used the comment “small steps help you spin faster”, I realized that’s another aspect of “step in the bucket”. If stepping in the bucket is close to the other foot, then spinning happens quickly. The farther away that you set down the foot, the more difficult it is to regain balance and spin well.
The Haidong Gumdo portion of this just requires that the next step be long enough to stop the spin and allow the extension (step) to end in a proper stance. This helps ensure that the movement promotes the proper cutting movement.

6) The tip before the hands.
This is one that takes a while to make sense. Students tend to think that swords are sharp, so they’ll cut. They many have used axes, which uses power sent down into a target to work. It takes a while to figure out how to generate the sword tip speed needed to successfully cut a target.
We have used the analogy of casting a “fishing line” as the way to get the sword tip to move quickly enough through the cut. Part of this cut development is the “whoosh” sound that comes as the cut is made. The goal is to make the sound happen above your head (early in the cut) to ensure the tip speed of the sword. If the sound happens at chest level the speed of the sword hasn’t reached its peak until after it has hit the target. This usually results in a failed cut.
7) Turn your torso, not change your stance.
As previously mentioned, all techniques start in your hips. This means that each motion, cut or block, causes either an opening of the torso (a whip-like motion that moves front to back) or a spiraling motion that leads the cutting motion downward or upward, even across. The key point here being that the hip position may “twitch” but always comes back to neutral (belt knot forward). This helps generate the necessary tip speed to cut targets. This motion also helps create the “rounded corners” at the end of cuts that maintain the flow and speed into the next cut.
Something that I tell my students, though, is that their lead shoulder should point at the target when setting for a cut AND their trailing shoulder should point at the target when finishing the cut. This shouldn’t affect the stance in any manner, though, or balance and speed will be compromised.
8) Pommel points toward target. (see the pictures across from this rule – both sides)
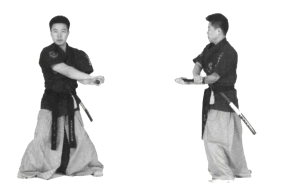
Well, this has been found to be limited to the upward cuts (left) and cross cuts (right). So, too bad, I still use it.
It is very common to set for an upward cut or a crosscut with the sword tip wrapped behind like winding up to do the cut. This tendency is makes the cut take too long and is ineffective.
9) Keep your arms long.
This one started as “all downward cuts MUST start above your head” but there were too many that bent their elbows doing the cut and thus ruined their target (mat) cutting. While the arms don’t need to be straight, they do need to make sure they get above your head. This version that I’ve started using is that “once the left hand (bottom hand) is out of view (when looking at your target), then the cut can truly start.
10) Don’t follow your sword tip.
This one is kind of simple but difficult to apply. There is enough talk about watching your target that a student shouldn’t need to continue watching the tip go past the target. A baseball/softball player doesn’t watch their bat after the ball is hit. They watched the ball from the pitcher to the bat, then into the field. A golfer watches the ball as they swing the club and continue to watch it after they hit the ball but never the club head. Where are your eyes when you finish your cut?
11) Rule of 45.
A goal in cutting is to have a clean 45 degree cut. This simulates a shoulder to hip cut. In fact, scoring cutting competitions follows the same rule. I’ve also applied this to cutting drills as a guide for knowing if your cut is proper.
I ask students to work at making sure the whole cut moves through a 45 degree line. The end point of the cut is reviewed on both downward and upward cuts. What I have them check is if sword is 45 degrees to either side of their center and 45 degrees above or below horizontal.
12) Don’t copy other students…completely.
Copying fellow students is a normal thing to do as you figure out the way techniques and movements happen. The opportunity to senior students doing the technique gives you some visual clues and details on how to do their version better.
The problem happens when you try to make your technique match the versions that you see when classmates do them. This is a problem because you are trying to do a version of the technique that isn’t yours! You haven’t figured out the details yet but mimic movement. I’ve used the analogy of cheating off your classmate’s test. All the parts that they get wrong, you get wrong. Don’t be that person! YOU need to make YOUR technique work for YOU.
The illustrations here also follow the limitations of the student. I don’t move nearly as well as my teen and 20-something students, so I need to make sure my techniques work for me. The basics will be the same but the parts may look slightly different. This is a point that some of my…older…students need to keep in mind, too. Don’t try to copy classmates who are 20-30 years younger than you are! Wisdom is supposed to come with age, so we need to work smarter not harder…but still work as hard as you can.
13) All cuts move through Chocheonsae…well, maybe not cross cuts.
While the cuts done from Jayunse are hard to see fitting in this rule, they still do. Basically, if you haven’t moved big enough to pass through the Chocheonse postion, then your cut isn’t big enough. The amount that Sodose and Beomse must travel to end in the proper position, they must move through the long dadose stance and the high ready cut position that is Chocheonse. For better insight on this, do Stance Focus Drill 1.
14) Speed in a form is the time between techniques (not sure who said this first)
You can only do your technique so fast. That’s it! The thing that you can do is start the next technique sooner BUT that can cause you to not finish the technique that you are currently doing. This is why forms look back – the technique is not being completed, yet the next one is starting. You can see this in Ssangsu Gumbub Il bon as done by a 10th Gup White belt or as done by a 1st Gup Red belt. The words to explain it is like this –
10th Gup White belt version – (after the draw) side straight cut, one thousand- one, one thousand- two, slide straight cut, one thousand- one, one thousand- two, slide straight cut.
1st Gup Red version – (after the draw) side straight cut, one thousand, slide straight cut, one thousand, slide straight cut.
This does follow the tactic of “Slow is Smooth and Smooth is Fast” because you need to go slow enough to do every technique completely, which allows you to move to the next technique quickly.
15) Dadosae + Sodosae + Beomsae + Gimajasae = Your Head Stays at the Same Height
This is why Rule #13 is there. So, if you’re in any of the stances listed here, then when you move to the next one (listed here) your head shouldn’t rise and fall through the movement. The only time the your head rises is when moving into a Jayeonse (Walking stance). For better insight on this, do Stance Focus Drill 1.
16) The free hand gets back on the handle as soon as possible.
This is often seen as students set to ready after drawing their sword. The left hand doesn’t re-grab the sword until it is almost to the ready position. That’s WAY too late. If the movement to ready needs to change to a cut, it’ll never happen. Being prepared isn’t only a Boy Scout motto!
17) Get the sword to its cutting set as quickly as possible.
One of the things that make student tilt and wobble is that their feet get to where they should be before the sword gets to its cutting position. This makes the last movements of the sword out of time and unbalances the student. It is pretty amazing how a couple pounds can throw off your movement especially while spinning around!
18) The Six things to prepare for every test are…stances, stances, stances, cut lines, cut line, cut lines.
This rule started in my Taekwondo class as stances, stances, stance, side kicks, side kicks, side kicks and morphed into these. As I worked with students preparing to test, I found that their excitement would get the better of them and important parts would disappear. Stances would get sloppy and techniques not completed.
Several components come into play with this. Concepts like “If you can’t do it slow, you can’t do it fast.” and “Slow is smooth and smooth is fast.” are included in this rule. Maintaining the correct techniques and moving from completion of technique into beginning of the next technique can be tied to proper stances.
Cut lines show their problems when trying to cut targets. It is one thing to swing a moggum (wooden sword) in a direction that mimics the actual cut BUT something completely different to make certain that the movement is actually the cut line. Making certain that cuts start consistently from the proper set points is VERY important. I believe that, if you focus on this, you can successfully cut targets from the very first try.
We will use the “whoosh” sound coming from the sword to help understand if the cut is correct. Different swords can help as the sound will change if the angle is different. One sound will be just right and others will sound really off. This means that it isn’t only the cut line. The inclusion of making sure that the “edge line” is correct.
19) Keep both hands on the sword as long as possible.
This one has appeared now, three years after the original post, after watching a student try to make a one-handed cut from a static stance. They tried to life the sword with one hand to the cutting position, so the cut, then try to stop the sword at the correct point. Granted it was only an aluminum kagum (training sword) and they only wobbled a little, BUT had it been a jimgum (3-4lbs carbon steel cutting blade), they probably would have injured themselves. Use the “extra” hand as long as possible through the cutting motion to help control and guide the sword.
Author: Master Robert Frankovich
As you read and enjoy the posts on this site, please consider “sharing” them! The “likes” help generate additional readership but “sharing” will help even more! Thank you for your assistance!
If you have questions, please feel free to contact me!

4 thoughts to “Master F.’s Rules (Haidong Gumdo edition)”
Great rules, very applicable. I’m still working on the Rule of 45 when I cut mats.
What do you think of Gibb’s rule Never Say Sorry?
Also, are there Taekwondo rules?
Great guidelines. We just need to remember that the guidelines need to be followed with purpose and the purpose is directed by the user. Great stuff again Master F.
Love these! I have 2 more personal ones, bend the knees, keep the back straight
Pingback: Master F’s Rules – Northwind Martial Arts LLC
Comments are closed.